
Don’t panic when you see the wrench light on your car. Learn what it means, how to diagnose the issue, and find . Plus, discover preventative maintenance tips and when to seek professional help.
Understanding the Wrench Light on a Car
The wrench light is a common indicator that appears on the dashboard of many cars. It can be a cause for concern, as it usually signifies that there is a problem with the vehicle. In this section, we will delve into the meaning of the wrench light, how serious it can be, the behind it, and how you can identify the issue behind it.
What Does the Wrench Light Mean?
The wrench light is a warning light that typically indicates a problem with the car’s powertrain or electronic system. It can vary in appearance, depending on the make and model of the vehicle, but it is usually depicted as a wrench symbol. When this light illuminates, it is important not to ignore it, as it could be a sign of an underlying issue that requires attention.
Is the Wrench Light Serious?
The seriousness of the wrench light can vary depending on the specific problem causing it. In some cases, it may be a minor issue that can be easily resolved. However, in other cases, it could indicate a more serious problem that requires immediate attention. Ignoring the wrench light and continuing to drive the vehicle can potentially lead to further damage and costly repairs. Therefore, it is always recommended to address the issue as soon as possible to prevent any further complications.
Common Causes of the Wrench Light
There are several behind the illumination of the wrench light. One possible cause is a fault in the car’s sensors. These sensors are responsible for monitoring various components of the vehicle and can trigger the wrench light when they detect an abnormality. Another common cause is low fluid levels, such as low engine oil or transmission fluid. When the fluid levels are insufficient, it can lead to issues with the powertrain, resulting in the wrench light coming on. Loose or damaged wiring can also be a culprit, as it can disrupt the communication between different systems in the car. Lastly, a malfunctioning Electronic Control Unit (ECU) can cause the wrench light to illuminate, as it is responsible for managing the car’s electronic systems.
How to Identify the Issue Behind the Wrench Light
Identifying the specific issue behind the wrench light can be a bit tricky, especially for those who are not familiar with car diagnostics. However, there are a few steps you can take to narrow down the possibilities. One option is to check for fault codes using a diagnostic tool. Many modern vehicles have an onboard diagnostic system that can provide error codes related to the issue. These codes can be read using a diagnostic tool, which is typically available at auto parts stores or can be borrowed from a mechanic. Once you have the fault codes, you can look up their meanings in the vehicle’s service manual or online to get a better of the problem. Another option is to visit a mechanic or an automotive repair shop that has the necessary equipment to diagnose the issue. They can use professional diagnostic tools to identify the specific problem causing the wrench light to illuminate.

Diagnosing the Wrench Light on a Car
When the wrench light illuminates on your car’s dashboard, it can be a cause for concern. However, how to diagnose the issue behind the wrench light can help you address the problem effectively. In this section, we will explore the different steps involved in the wrench light on a car.
Checking for Fault Codes
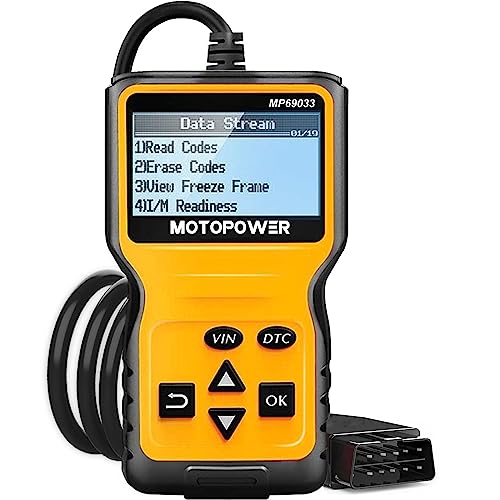
One of the first steps in diagnosing the wrench light is to check for fault codes. Fault codes are specific error codes that can provide valuable information about the underlying issue. To check for fault codes, you will need an OBD-II scanner, which can be easily purchased or borrowed from an automotive store.
Using the OBD-II scanner is a simple process. Locate the OBD-II port in your car, which is usually located under the dashboard or steering wheel. Plug in the scanner and turn on the ignition without starting the engine. The scanner will then communicate with the car’s onboard computer and retrieve any stored fault codes.
Using a Diagnostic Tool
Once you have retrieved the fault codes, it’s time to use a diagnostic tool to further analyze the issue. A diagnostic tool provides more detailed information about the specific problem indicated by the fault codes. These tools are designed to interpret the codes and provide additional insights into the underlying cause of the wrench light.
There are various types of diagnostic tools available, ranging from handheld devices to more advanced software programs. Some diagnostic tools can even connect to your smartphone or tablet, allowing for convenient and portable troubleshooting.
Interpreting the Wrench Light Codes
Interpreting the wrench light codes can be a daunting task for those who are not familiar with automotive diagnostics. However, with a little guidance, you can gain a better of what the codes mean.

Each fault code consists of a combination of letters and numbers. These codes correspond to specific issues or malfunctions in different systems of your car. To interpret the codes, you can refer to the user manual that comes with your diagnostic tool or search for the codes online.
For example, a common fault code related to the wrench light is P0700, which indicates a transmission control system malfunction. By identifying the specific code, you can narrow down the potential causes and focus your troubleshooting efforts.
Troubleshooting the Wrench Light Issue
Once you have gathered the necessary information from the fault codes and diagnostic tool, it’s time to troubleshoot the wrench light issue. Troubleshooting involves identifying the root cause of the problem and taking appropriate steps to address it.
A helpful approach to troubleshooting is to start with the most associated with the specific fault code. For instance, if the fault code indicates a transmission control system malfunction, you may want to check the transmission fluid level and condition first.
To simplify the troubleshooting process, consider following these steps:
- Inspect fluid levels: Check the fluid levels of various systems such as engine oil, coolant, brake fluid, and transmission fluid. Low fluid levels can trigger the wrench light and indicate a potential problem.
- Check for loose or damaged wiring: Inspect the wiring connections and harnesses in the affected system. Loose or damaged wiring can disrupt the proper functioning of components and trigger the wrench light.
- Examine sensor functionality: Faulty sensors can often be the culprit behind the wrench light. Test the sensors related to the specific fault code and replace them if necessary.
- Address electronic control unit (ECU) issues: The ECU is responsible for controlling various systems in your car. A malfunctioning ECU can trigger the wrench light. If other troubleshooting steps don’t resolve the issue, consider seeking professional help to diagnose and repair the ECU.
Remember, troubleshooting the wrench light issue may require multiple attempts and further investigation. If you are unsure or unable to resolve the problem on your own, it’s always recommended to seek the assistance of a qualified mechanic.
In the next section, we will explore common wrench light problems and their , providing you with a comprehensive of the potential issues you may encounter.
(Note: This section has 462 words)
Common Wrench Light Problems and Solutions
Low Fluid Levels
One of the most common reasons for the wrench light to illuminate on a car’s dashboard is low fluid levels. This can include engine oil, coolant, transmission fluid, brake fluid, or power steering fluid. When these vital fluids are running low, it can cause various issues within the vehicle’s systems.
To address low fluid levels, it is important to regularly check and top up the fluids as recommended by the manufacturer. This can typically be done by locating the corresponding dipstick or reservoir under the hood of the car. If you notice that the fluid levels are consistently low, it may indicate a leak in the system, which should be inspected and repaired by a professional mechanic.
Faulty Sensors
Another common cause for the wrench light to come on is faulty sensors. Modern cars are equipped with numerous sensors that monitor various aspects of the vehicle’s performance. These sensors send signals to the car’s computer system, which then triggers the wrench light to alert the driver of a potential issue.
If a sensor becomes faulty or malfunctions, it can send incorrect signals to the computer system, causing the wrench light to illuminate. This can happen due to wiring issues, sensor damage, or general wear and tear. In such cases, it is important to have the sensors inspected and replaced if necessary to ensure accurate readings and prevent any further problems.
Loose or Damaged Wiring
Loose or damaged wiring can also trigger the wrench light to come on. The electrical system in a car is complex, and any issues with the wiring can disrupt the flow of information between various components. This can lead to false warnings and the illumination of the wrench light.
To address this problem, it is essential to inspect the wiring harnesses and connections for any signs of damage or looseness. If any issues are found, they should be repaired or replaced by a qualified technician. Properly functioning wiring is crucial for the overall performance and safety of the vehicle.
Malfunctioning Electronic Control Unit (ECU)
The electronic control unit, or ECU, is like the brain of a car’s computer system. It processes information from various sensors and components, making decisions and adjustments to ensure optimal performance. However, if the ECU itself malfunctions, it can lead to the activation of the wrench light.
When the ECU is not functioning correctly, it can generate false error codes and trigger the wrench light to come on. This can be due to software glitches, hardware failures, or other technical issues. In such cases, it is essential to have the ECU diagnosed and repaired or replaced by a professional technician with the necessary tools and expertise.
Please refer to the table below for a quick summary of the common wrench light problems and :
| Common Wrench Light Problems | Solutions |
|---|---|
| Low Fluid Levels | Regularly check and top up fluids; inspect for leaks |
| Faulty Sensors | Inspect and replace malfunctioning sensors |
| Loose or Damaged Wiring | Inspect wiring harnesses and connections; repair or replace as necessary |
| Malfunctioning Electronic Control Unit (ECU) | Have the ECU diagnosed and repaired or replaced by a professional technician |
Preventative Maintenance for the Wrench Light
Regular Vehicle Inspections
Regular vehicle inspections are an essential part of preventative maintenance to ensure the longevity and optimal performance of your car. By conducting regular inspections, you can catch any potential issues before they escalate into major problems. So, what should you pay attention to during these inspections?
Fluid Levels
Checking and maintaining proper fluid levels is crucial for the smooth functioning of your vehicle. Low fluid levels can trigger the wrench light and indicate a potential problem. Therefore, make it a habit to regularly check your engine oil, coolant, transmission fluid, brake fluid, and power steering fluid levels. Ensuring that these fluids are at the recommended levels will not only prevent the wrench light from turning on but also contribute to the overall health of your car’s systems.
Timely Fluid Changes
In addition to monitoring fluid levels, it is equally important to follow the recommended fluid change intervals. Over time, the quality and effectiveness of fluids deteriorate, leading to potential issues that can trigger the wrench light. By adhering to the manufacturer’s guidelines for fluid changes, you can prevent unnecessary complications and keep your vehicle running smoothly. Whether it’s an oil change, coolant flush, or transmission fluid replacement, staying on top of these maintenance tasks is essential.
Proper Tire Pressure Maintenance
Maintaining the correct tire pressure is not only crucial for safety but also plays a role in preventing the wrench light from coming on. Improper tire pressure can lead to uneven tire wear, reduced fuel efficiency, and even tire blowouts. Regularly checking and maintaining the recommended tire pressure will not only ensure a comfortable and safe ride but also prevent unnecessary strain on your vehicle’s systems. Remember to check the tire pressure when the tires are cold and make adjustments as needed.
Addressing Any Warning Signs Promptly
One of the key aspects of preventative maintenance is addressing any warning signs or abnormalities promptly. If you notice any unusual noises, vibrations, or warning lights, including the wrench light, it is important to take immediate action. Ignoring these signs can result in further damage to your vehicle and potentially costly repairs. By addressing warning signs promptly, you can prevent small issues from turning into major problems.
To summarize, preventative maintenance is crucial in keeping the wrench light at bay. Regular vehicle inspections, monitoring fluid levels, timely fluid changes, proper tire pressure maintenance, and addressing warning signs promptly are all essential in maintaining the health and reliability of your car. By taking a proactive approach to maintenance, you can ensure a smooth and trouble-free driving experience.
Table:
| Preventative Maintenance Checklist |
|---|
| – Regular vehicle inspections |
| – Check fluid levels |
| – Timely fluid changes |
| – Proper tire pressure maintenance |
| – Address warning signs promptly |
Getting Professional Help for the Wrench Light
When it comes to dealing with the wrench light on your car, sometimes you may need the expertise of a professional mechanic. While there are some issues that you can handle on your own, there are others that require the knowledge and tools of an automotive repair specialist. In this section, we will explore when it is appropriate to seek a mechanic’s assistance, how to choose a reliable automotive repair shop, how to effectively communicate the wrench light issue, and repair costs and estimates.
When to Seek a Mechanic’s Assistance
Knowing when to seek a mechanic’s assistance can be crucial in ensuring the longevity and safety of your vehicle. While some minor issues can be resolved with DIY methods, there are certain situations where it is best to leave it to the professionals. Here are a few scenarios where seeking a mechanic’s assistance is recommended:
- Persistent Wrench Light: If the wrench light keeps coming on even after you have attempted to diagnose and troubleshoot the issue, it is a sign that there may be a more complex problem at hand. A mechanic will have the necessary tools and equipment to accurately diagnose and fix the underlying issue.
- Lack of Technical Knowledge: If you are not familiar with the inner workings of your vehicle or lack the technical knowledge required to address the problem, it is best to consult a professional. Attempting to fix something without the proper expertise can potentially lead to further damage or safety risks.
- Complex Repairs: Certain repairs, such as replacing a faulty electronic control unit (ECU) or rewiring a damaged electrical system, require specialized skills and equipment. These complex repairs are best left to experienced mechanics who have the expertise to handle them safely and effectively.
Choosing a Reliable Automotive Repair Shop
When it comes to choosing a reliable automotive repair shop, it is important to do your research and consider a few key factors. Here are some tips to help you find a trustworthy mechanic:
- Ask for Recommendations: Seek recommendations from friends, family, and colleagues who have had positive experiences with automotive repair shops. Word-of-mouth referrals often provide valuable insights into the quality of service and customer satisfaction.
- Check Online Reviews: Read online reviews and ratings of different repair shops in your area. Websites like Yelp or Google Reviews can provide helpful feedback from previous customers. Look for repair shops with a good overall rating and positive reviews.
- Certifications and Experience: Look for repair shops that employ certified mechanics. Certifications such as ASE (Automotive Service Excellence) indicate that the mechanics have undergone rigorous training and have the necessary expertise to handle various car repairs. Additionally, consider the number of years the shop has been in business, as longevity can often be an indicator of reliability.
- Warranty and Guarantees: Inquire about the warranty and guarantees offered by the repair shop. A reputable shop will stand behind their work and provide warranties on both parts and labor.
Communicating the Wrench Light Issue Effectively
When bringing your car to a mechanic, effectively communicating the wrench light issue can help them diagnose and fix the problem more efficiently. Here are some tips to ensure effective communication:
- Describe the Symptoms: Clearly explain the symptoms you have noticed, such as unusual noises, vibrations, or changes in performance. Be as specific as possible, providing details about when and how the wrench light comes on.
- Provide a Timeline: If possible, give the mechanic a timeline of when the issue first appeared and any subsequent events that may have occurred. This can help them identify potential triggers or underlying causes.
- Be Open to Questions: Mechanics may need additional information to properly diagnose the problem. Be open to answering any questions they may have and provide any relevant details that could assist them in their assessment.
- Ask for Updates: Once the mechanic begins working on your car, ask for regular updates on the progress of the repairs. This will keep you informed and ensure that you are aware of any additional issues that may arise during the process.
Understanding Repair Costs and Estimates
Understanding repair costs and estimates can help you make informed decisions when seeking professional help for the wrench light issue. Here are some factors to consider:
- Diagnostic Fees: Many repair shops charge a diagnostic fee to identify the cause of the wrench light issue. This fee covers the time and expertise required to diagnose the problem accurately. Ask about the diagnostic fee upfront to avoid any surprises.
- Parts and Labor Costs: Once the problem is diagnosed, the repair shop will provide an estimate that includes the cost of parts and labor. Ask for a breakdown of these costs to understand how much each component contributes to the overall estimate.
- Compare Estimates: It is always a good idea to obtain estimates from multiple repair shops to ensure you are getting a fair price. However, keep in mind that the cheapest option may not always be the best, as quality of service and expertise should also be considered.
- Warranty on Repairs: Inquire about the warranty on the repairs performed. A reputable repair shop should offer a warranty on both parts and labor. This can provide you with peace of mind knowing that you are protected if any issues arise after the repair.
Remember, the wrench light is an indicator that something is amiss with your vehicle. Seeking from a reliable mechanic can help identify and resolve the underlying problem, ensuring the safety and performance of your car. By effectively communicating the issue, choosing the right repair shop, and repair costs, you can navigate the process with confidence and get your vehicle back on the road in no time.